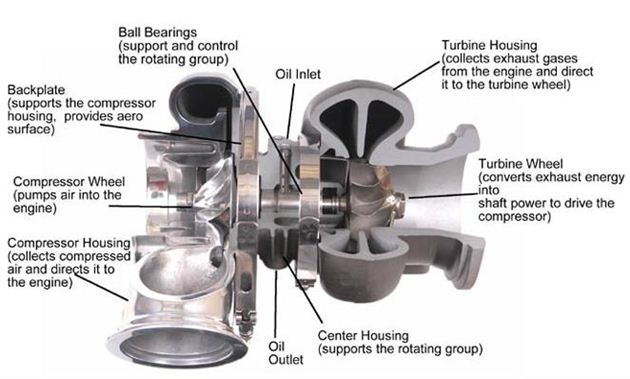
Have you ever wanted to know how to install a turbocharger, but the task seems too daunting? Don’t wait to upgrade your turbo! Let expert mechanics at BuyAutoParts help with this step by step guide. Please note, these how to install a turbocharger instructions apply to all turbochargers and are to be used in addition to professional instructions, NOT as a substitute.
Step 1: Clear out the air cleaner and ducting to the compressor interior
1. Before you install a turbocharger, be sure to clear any foreign material in the air cleaner and the ducting to the compressor interior in the exhaust manifold. Even small or soft objects will cause extensive damage to the turbocharger wheels.
Step 2: Keep the turbocharger opening debris free
2. Avoid getting dirt or debris into the turbocharger openings.
Step 3: Check the bolts
3. New and replacement turbochargers may have bolts missing or deliberately left loose to facilitate installation. A bolt kit, not supplied by MAP, may be required. If the turbocharger bolts are all tight, all lock tabs bent up and the compressor and turbine housings are correctly aligned proceed to Step 10. Otherwise, proceed to Step 4.
Re-Alignment of End Housing
Step 4: Loosen compressor and turbine housing bolts
4. Loosen the aluminum compressor and cast iron turbine housing bolts and/or V-band nut(s) the minimum required to permit the housings to rotate on the center housing. Excessive loosening of the housings will allow contact and possible wheel damage. Bolts should not have to be loosened more than 1 1/2 turns.
Step 5: Temporarily secure the turbo
5. Temporarily secure the turbocharger to the engine exhaust manifold outlet flange with two bolts.
Step 6: Rotate center housing
6. Rotate the center housing, so that the oil inlet and outer pads will mate with the engine lines. The oil outlet (large hole) must be at the bottom with the centerline of the hole not more than 35° from vertical. Snugly tighten at least two bolts on the V-band to lock the housing in place.
Step 7: Rotate the compressor housing
7. Rotate the compressor housing, until it lines up with the intake manifold or intercooler ducting. Snugly tighten at least two bolts or V-band to lock the housing in place.
Step 8: Remove the turbocharger
8. Remove the turbocharger from the engine and tighten all bolts and/or V-band nuts. Tighten the bolts alternately from side to side to prevent cocking of the housing. Turn the V-band nuts slowly as the torque setting is approached, (tapping the band slightly with a soft mallet), to allow for the band to fully seat. Refer to the torque valves specified in the applicable manual.
| Type | Torque |
|---|---|
| T3 automotive | 165 in./lbs |
| Compressor (GT Series) | 145-165 in./lbs. |
| Turbine (GT Series) | 185-215 in./lbs. |
| Compressor and Turbine (Navistar) | 185-215 in./lbs |
| All other models | 140 in./lbs |
Bend Lock Tabs
Step 9: Bending lock tabs
9. Bend lockplate tabs up against a flat on each bolt head (if not already bent) on bolted housing models. Bend in a direction that will tend to tighten, not loosen, the B-band nuts are self-locking.
Installation and Pre-Oiling of Turbos
Step 10: Remove the old gasket
10. Remove the old gasket from the exhaust manifold-mounting flange, inspect flange for erosion and flatness, and install a new gasket, if used.
Step 11: Inspect oil drain and supply lines
11. Inspect oil drain and supply lines for kinking, clogging, restrictions, and other signs of deterioration. *Replacing the oil feed line is a requirement to validate your warranty*.
Step 12: Install turbo on the engine
12. Install the turbocharger on the engine using all new gaskets and o-rings (when needed), but do not connect the compressor inlet and oil supply line. Tighten the nuts or bolts attaching the turbocharger to the exhaust manifold to the torque values giving in the shop manual. Use of a high-temperature lubricant on these threads is recommended.
Step 13: Fill oil inlet hole with clean oil
13. Fill the oil inlet hole with clean engine oil and spin the compressor wheel several times to coat the bearings with oil. Refill the oil inlet hole and connect the oil supply line.
Step 14: Connect a pipe or hose from the air filter outlet
14. If the compressor wheel cannot be freely spun by hand or if there is any indication of rubbing or scraping, determine the reason before starting the engine. One cause of wheel rubbing is a cocked compressor or turbine housing. T04 and T04B turbochargers may have a slight drag before running, which is a normal condition. Connect the pipe or hose from the outlet of the air filter to the compressor inlet.
Step 15: Check lubricant level in engine crankcase
15. Check lubricant level in engine crankcase. Prime the oil filter if it was changed.
Start Engine
Step 16: Crank the engine
16. Before attempting to start the engine, crank the engine with fuel shut off for 10-15 seconds, or until the instruments show an oil pressure build-up.
Step 17: Start the engine
17. Start the engine and allow it to run at idle speed for 3-4 minutes before accelerating.
Step 18: Check for oil leaks
18. Check for oil leaks.
Where to Find a Turbocharger to Install in a Car
BuyAutoParts.com offers the best resources and OEM-quality turbochargers to fit your car. With helpful turbocharger buying guides and an extensive selection of turbos, we’re the best option for saving money with your turbocharger replacement project.
What’s more, you’ll also find helpful how-to videos and instructional content on turbochargers from our team of turbocharger experts. This exclusive material will assist you step-by-step to ensure a successful turbocharger installation.


