SERVICE OPERATIONS GENERAL INFORMATION:
General Service Information:
It is recommended that a new receiver-drier or accumulator-drier be installed if a compressor is replaced or a repair is made.
1. Keep dirt and foreign material from getting on or into the compressor of the A/C system. The area around A/C hose fittings should be carefully cleaned with a non-petroleum-based solvent before the connections are broken. All parts to be re-used or installed should be cleaned with a non-petroleum-based solvent and blown dry with cleaned compressed air or lint-free cloths.
2. Trouble-free installation and operation of an SD compressor require:
a) Correct pulley alignment.
b) Correct fit of compressor mounting surfaces to the bracket and correct fit of the bracket to the engine. Clearance between compressor and bracket should not exceed 0.2mm (0.008in.) per ear for ear-mount compressors or 0.4mm (0.016 in.) total for 2 ears.
c) Correct torque of all mounting bolts and nuts.
d) Correct drive belt tension.
3. Never operate the compressor at high speed for a prolonged time without sufficient refrigerant charge in system. Probable results are overheating, internal damage and seizure.
4. If an internal repair is performed on an R134a compressor, evacuate the A/C system for at least 45 minutes before recharging to remove moisture which may have been absorbed by the PAG oil in the compressor.
5. Parts which require lubrication before assembly, such as O-rings, should be lubricated with clean 5GS refrigerant oil.
SERVICE OPERATIONS OIL CHANGING :
Compressor Repaired Internally and Reinstalled in the System:
1. Before any internal repair is done, drain the oil from the compressor.
2. Trouble-free installation and operation of an SD compressor require:
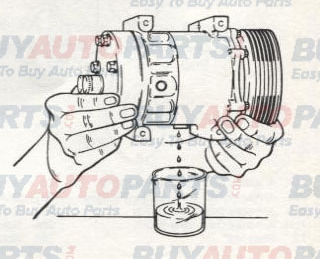
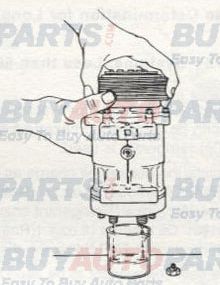
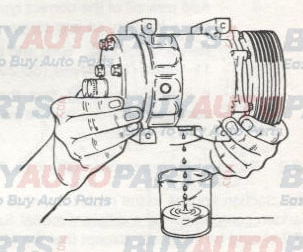
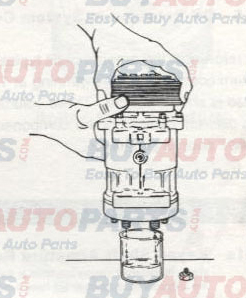
a) Remove the oil plug and drain as much oil as possible into a suitable container.
b) Remove the caps (if present) from suction and discharge ports.
c) Drain oil from the suction and discharge ports into a suitable container while turning the shaft clockwise only with a socket wrench on the armature retaining nut.

2. Measure and record the amount of oil drained from the compressor.
3. Inspect the oil for signs of contamination such as discoloration or foreign material.
4. Perform repairs to the compressor.
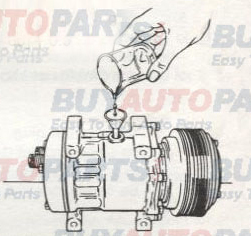
5. Add the same amount of new oil to the compressor as was measured in step 2. Be sure to use the correct oil for the compressor.
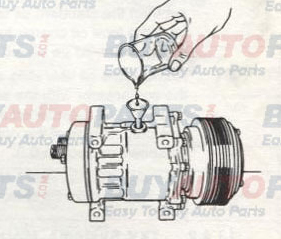
6. Re-install oil plug. Seal and O-ring must be clean and not damaged. Torque to 11-15 ft•lb (15-20 N-m, 150-200 kgf-cm). Be careful not to cross-thread oil plug.
7. It is recommended that the oil quantity be confirmed after re-installation of the compressor to the vehicle.
Sanden Compressor Replaced by a New Sanden Compressor of the Same Type:
1. Drain the oil from the old compressor; measure and record the amount flowing into a container.
2. Drain the oil from the new compressor.
3. Add new oil of the correct type to the new compressor. Use the same quantity as was removed from the old compressor in step 1.
4. Re-install oil plug. Seal and O-ring must be clean and undamaged. Torque to 11-15ft•lb (15-20 N-m,150-200 kgf-cm).
5. It is recommended that the oil quantity be confirmed after the installation of the new compressor to the vehicle.
Sanden Compressor Used to Replace a Compressor of a Different Type:
This Section applies to the replacement of another manufacturer's compressor or to the replacement of a Sanden compressor by a different model Sanden compressor. In this case, the procedure in the section 'sanden Compressor Replaced by a New Sanden Compressor of the Same Type should be followed, except that the oil quantity must be confirmed after installation of the new compressor to the vehicle.
Oil Charge Determination for Long Hose Applications:
TXV Systems. Less than 56 oz. (1600g) Refrigerant Charge:
1. The desired oil charge for systems with unusually long hoses, such as trucks, tractors. etc.. can be determined based on the total refrigerant charge when less than 56 oz. (1600g) of refrigerant is used.
2. Calculate the desired oil charge as below:
SD5H14:
Oil amount (ft.oz.) = (Refrigerant charge in oz. x 0.125)+1.35.
Oil amount (cc) = (Refrigerant charge in grams x 0.125) + 40.
SD7H15:
Oil amount (ft.oz.) = [(Refrigerant charge in oz. x 0.06) +2.2] + 0.9.
Oil amount (cc) = [(Refrigerant charge in grams x 0.125) + 60] + 0.9.
3. For a new compressor to be used in this type of system, subtract the standard oil charge from the total oil charge to determine how much oil should be added to the compressor.
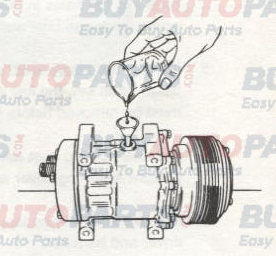
4. Remove the oil filler plug and charge the compressor with the amount of additional oil determined in step 3. Use only new oil of the correct type on your compressor.
5. Re-install oil plug. Seat and O-ring must be clean and not damaged. Torque to 11 - 18 ft•lb (15 - 25 N-m, 150 - 250 kgf-cm).
TXV Systems. More than 56 oz. (1600g) Refrigerant Charge:
For systems with more than 56 oz. (1600g) refrigerant, on-vehicle testing is required to determine the oil charge.
1. Charge system with refrigerant.
2. Set up the vehicle as follows:
a) Doors open.
b) Maximum blower speed.
c) Ambient temp. at least 75-F(24-C).
3. Run the compressor at one of the speeds listed in the table below for 10 - 15 minutes.
4. While maintaining engine speed, turn off A/C system and immediately turn off engine.
5. Recover refrigerant from the system.
6. Remove compressor from vehicle.
7. Remove the oil plug and drain as much oil as Possible into a suitable container.
8. Drain oil from the suction and discharge ports into a suitable container while turning the shaft clockwise only with a socket wrench on the armature retaining nut.
9. Measure and record the volume of oil drained from the compressor.
10. Approximately 0.5 ft. oz. (15cc) will remain in the compressor as a film coating the internal surfaces. Add 0.5 ft. oz. (15cc) to the recorded volume of oil. This is the calculated amount of oil in the compressor.
11. The amount of oil in the compressor after running for 10-15 minutes should be as per the table below, if the proper amount of oil was in the system. Determine from the table what the correct amount of oil should be for the particular speed used in step 3. (The table shown applies to SD5H14 compressors. Other compressors will exhibit a lesser oil amount dependent upon type. It is important that a quantity of oil remains in the crankcase after the test.).
| Comp. RPM | Oil in Compressor | |
| fl.oz | cc | |
| 1,000 | 3.4 | 100 |
| 2,000 | 2.5 | 75 |
| 3,000 | 1.7 | 50 |
| 4,000 | 1.3 | 40 |
| 5,000 | 1.2 | 35 |
12. Compare the desired amount of oil as determined in step 11 with the calculated actual amount of oil in the compressor, which was determined in step 10. If the amount of oil actually in the compressor [amount drained plus 0.5 ft. oz(15cc)] is less than the desired amount of oil, add oil as necessary to the container and pour back into the compressor. If the amount of oil actually in the compressor is too much, remove oil from the container until the correct amount is reached, and pour the oil back into the compressor. The amount of oil poured back into the compressor should equal the desired amount (from the table), minus 0.5 ft. oz. (15cc). Use the correct oil type.
13. Re-install oil plug. Seal and O-ring must be clean and not damaged. Torque to 11-15 ft•lb (15 - 20 N-rn. 150 -200 kgf-cm).
